 Mon-Fri 07:00am-06:00pm

 Emergency Services are available for an additional fee


Your Guide to Hooking Up a Doorbell Chime Quickly and Easily
The Basics of Hooking Up a Doorbell Chime
Hooking up a doorbell chime involves connecting three main components: a push button, a transformer, and the chime unit itself. Here’s a quick overview:
- Turn off power at the circuit breaker
- Identify and label existing wires (Front, Rear, Trans)
- Connect transformer to household power (10-24V AC)
- Wire the chime unit’s terminals correctly
- Install and connect the doorbell button
- Restore power and test the system
Most standard doorbell chimes operate on 16 volts of alternating current (AC) supplied by a transformer that converts your home’s 120V power to a safer low-voltage output. The transformer is typically mounted near your electrical panel or inside a junction box. When someone presses your doorbell button, it completes a circuit that activates an electromagnetic solenoid in the chime, creating that familiar “ding-dong” sound.
Installing a doorbell chime is considered a manageable DIY project that can save you money, but it’s important to follow safety protocols and understand the basics of low-voltage wiring. Even though doorbell systems operate at low voltage, you should always turn off power at the breaker before working with any electrical components.
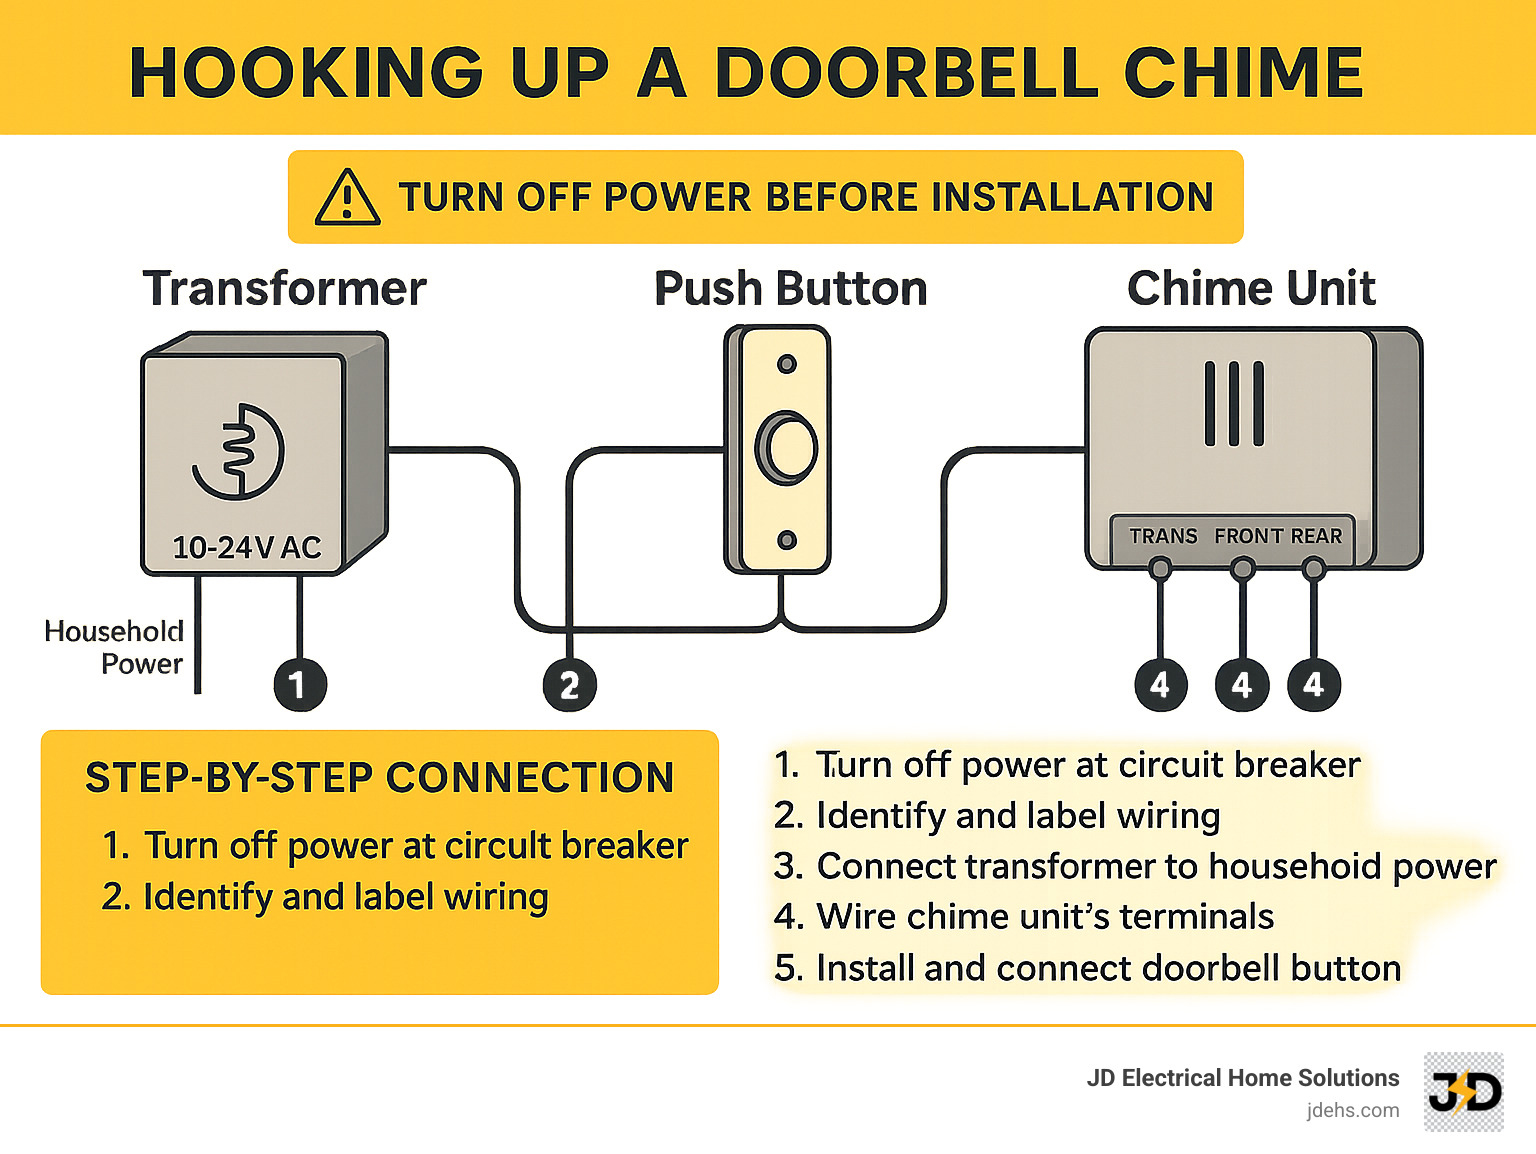
Understanding Your Doorbell Chime System
Before you grab your tools and start hooking up a doorbell chime, let’s understand what makes these systems work.
Main Components & How They Work
Your doorbell system has three key components:
The push button is what visitors press, completing an electrical circuit.
A transformer converts your home’s 120-volt AC current into a gentler 16-volt AC that’s safe for your doorbell system. Most standard chimes need 16 volts, though simpler buzzers might run on 10 volts, and fancy four-note chimes sometimes require up to 20 volts.
The chime unit contains an electromagnetic solenoid that creates the classic “ding-dong” sound. When someone presses your doorbell, electricity flows through the solenoid, creating a magnetic field that pulls a plunger. This plunger strikes one tone bar (making the “ding”) and hits another on its way back (creating the “dong”).

Tools & Materials Checklist
You’ll need: screwdrivers (flathead and Phillips), wire strippers/cutters, a non-contact voltage tester, drill and bits with wall anchors, masking tape and marker to label wires, and a multimeter to test voltage.
Materials include: your new doorbell chime unit, doorbell button(s), possibly a new transformer, 18-gauge bell wire, wire connectors, electrical tape, and mounting screws.
Safety First: Power-Off & Test
Always start by turning off power at the circuit breaker. Verify the power is truly off with your non-contact voltage tester.
If replacing an existing chime, take a photo of the current setup and label each wire before disconnecting anything. While doorbell voltages are generally considered safe, wearing insulated gloves is still good practice.
Hooking Up a Doorbell Chime: Step-By-Step

Preparing for Hooking Up a Doorbell Chime Safely
Before starting, turn off the circuit breaker that controls your doorbell transformer. Gather all tools and materials beforehand. If replacing an existing chime, remove the cover and photograph the current wiring setup. Label each wire with masking tape (Front, Trans, Rear).
Most modern doorbell chimes need a 16-volt transformer. For adding a second chime, you might need to upgrade to a 30 VA transformer. Mount your chime between 40 and 55 inches above the floor in a central location.

Wiring & Testing When Hooking Up a Doorbell Chime
If replacing an old chime, disconnect the wires from the terminals. Position your new chime, mark the mounting holes, and secure it to the wall using anchors if needed.
Connect the wires to the right terminals:
– Transformer wire to “TRANS” or “COM” terminal
– Front door button wire to “FRONT” or “F” terminal
– Back door button wire to “REAR” or “R” terminal
Tighten each terminal screw firmly. Restore power and test each button. The front door should produce a “ding-dong” two-note melody, while the back door should give a single “ding.”
If something’s not working, check the voltage at the transformer with a multimeter. You should see between 14 and 16 volts AC.
Expanding the System: Multiple Buttons or Chimes
To add a second button, run 18-gauge bell wire from your chime to the second button location. Connect one wire to the “REAR” terminal and the other to the “TRANS” terminal.
For adding a second chime, ensure your transformer has enough power (30 VA recommended). Connect everything in parallel:
– Connect both chimes’ “TRANS” terminals together and to the transformer
– Connect both “FRONT” terminals together and to the front door button
– Connect both “REAR” terminals together and to the back door button

Common Problems & Quick Fixes
If your doorbell doesn’t ring, check: power to the transformer, secure connections, and test the button with a multimeter.
A weak chime often indicates a transformer issue or loose connections. Continuous ringing usually means a stuck button or a short circuit. Buzzing sounds typically point to transformer problems.
Conclusion & Next Steps
Hooking up a doorbell chime is a manageable DIY project that most homeowners can complete in a few hours. Remember these key points:
- Always turn off power at the breaker before starting
- Double-check with a voltage tester
- Label wires clearly to avoid confusion
Most doorbell issues have simple solutions. A weak chime might need a transformer upgrade, while a non-functioning button might just need tightened connections or replacement.
For maintenance, occasionally check outdoor components for corrosion or loose connections, especially after severe weather. Wipe down buttons and chime covers to keep everything looking fresh.
If your project becomes complicated—perhaps running new wiring through finished walls or upgrading to a smart home system—consider calling in professionals. A properly functioning doorbell is a small home comfort that makes a big difference, providing that reassuring chime when someone arrives at your door.


